
 Remember the Studded Nailhead Dresser that I posted a few months ago? After tons of requests for a tutorial, I finally decided to get this post together...

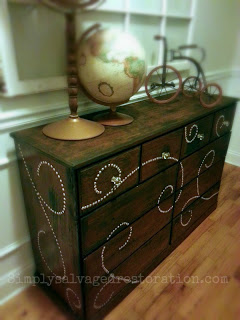
I started by sanding this piece as if I were going to paint it- by removing about 80% of the existing finish. I wanted the wood to have a rustic look so, after sanding, I dry brushed on CeCe Caldwell's Vermont Slate in random places with the grain of the wood.

After Vermont Slate, I stained with 3 heavy coats of Dark Walnut by MinWax.
Between the existing finish, Vermont Slate, and the Dark Walnut stain, I had a great variation of color that created that rustic look I was going for.
After stain, I sealed it with Polyurethane and allowed it to dry over night.
Next, I started my swirls...
I free handed them with white chalk- keeping a damp rag on hand for when I needed to wipe off and redraw.

Once I was satisfied with my swirls, I used a ruler to mark every half inch but
After about one ruler of half inches, I gave up and started eyeballing it =)

I used an little bitty drill bit to make a hole at every half inch mark- making sure that my drill bit didn't penetrate all the way through the drawer front. This allowed the point of the tack to also penetrate the wood (inside of my little bitty hole) to help prevent my tacks from coming lose.
(Using the drill bit to make my holes was to prevent the nail heads from bending when I hammered them into the wood).
Did I lose you?
This was my 1st swirl- I didn't wipe off the chalk before applying the tacks.
Not much of a big deal, it was just a little difficult to wipe the chalk from between each tack.


So, the next time I knew better and finished all of the holes then wiped off my chalk before I hammered in any of the tacks.

I love the contrast between the rustic dark wood and the shiny silver nail heads.
.jpg)
There were a few ''oops'' places where I drilled too deep and the tack wouldn't grip inside of the wood- for these places, I marked the hole, then went back and added a little dot of super glue over the hole before putting the tack in.
This project used 13 packs of 48ct tacks. That's 642 holes drilled, 642 tacks hammered and about 12 hours of my time.
This was actually a really fun project... a little tedious and time consuming, but fun.
Sometimes beauty requires a little patience.


very cool! it looks awesome!
ReplyDeleteThank you Cassie!!
DeleteGorgeous! Superb tutorial too!
ReplyDeleteIt's late finding this act. At least, it's a thing to be familiar with that there are such events exist. I agree with your Blog. Go with site webstagram to download free anything you like on instagram.
ReplyDeleteelectrician near me
ReplyDeleteHome AC Repair Near Me
CCTV Installation near me
plumber services near me
electrician services near me
Whether you're attempting to find unfastened WAEC expo 2023, the excellent Waec expo runs, WAEC examination runz, 2023 WAEC expo runz, correct WAEC solutions 2023, or WAEC questions and answers 2023, you may get all the questions and their correct answers for each of your issue to help improve your performance. Read more at https://gistpower.com/waec-second-series-exams-best-waec-2nd-series-expo-site-waec-second-series-runs-website-and-waec-2nd-series-answers-group-before-exam.
ReplyDeleteWant to play slots without the hassle? slot baru makes it super easy! No lag, no stress—just fun and big wins waiting for you. With high RTP games (98%!), a low deposit requirement of just 10k via BCA, and 24/7 support, you’re in for an awesome experience. 😍 Whether you're new to slots or a seasoned player, you’ll love the smooth gameplay and fair winning chances. Try your luck today! 🍀
ReplyDelete